Connection wizard can help to set events between two components within a form without having to write code manually.
Work on the exercise in last post "HelloNetBeans: Create Java Desktop Application using NetBeans IDE".
- Add a Button on Design Pane
- Right click on Button, Edit Text and enter "Click Me" as the text on the button.

- Switch Connection Mode.

- Select the component (JButton1) that will fire the event, the selected component is highlighted in red when selected.
- Select the component (JLabel1) whose state you want to affect with the event.
- NetBeans will open Connection Wizard.
- Accept jButton1 as Source Component.
- Expand and select mouse -> mouseClicked as the source Events, with jButton1MouseClicked as Method Name in Event Handler Method.
- Click Next.

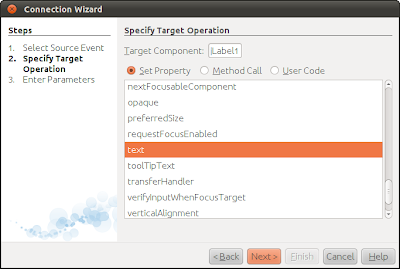
- Accept jLabel1 as Target Component.
- Select Set Property.
- Select text. and click Next.

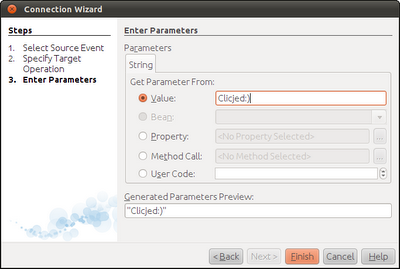
- Select and Enter Value of any text you want, and click Finish.

- NetBeans will generate the code for you.

- Save and Run it again.

Work on the exercise in last post "HelloNetBeans: Create Java Desktop Application using NetBeans IDE".
- Add a Button on Design Pane
- Right click on Button, Edit Text and enter "Click Me" as the text on the button.

- Switch Connection Mode.

- Select the component (JButton1) that will fire the event, the selected component is highlighted in red when selected.
- Select the component (JLabel1) whose state you want to affect with the event.
- NetBeans will open Connection Wizard.
- Accept jButton1 as Source Component.
- Expand and select mouse -> mouseClicked as the source Events, with jButton1MouseClicked as Method Name in Event Handler Method.
- Click Next.

- Accept jLabel1 as Target Component.
- Select Set Property.
- Select text. and click Next.

- Select and Enter Value of any text you want, and click Finish.

- NetBeans will generate the code for you.

- Save and Run it again.

No comments:
Post a Comment